
Mobility is the secret sauce that unlocks effortless movement, fuels athletic performance, and keeps aches and pains at bay. But how do you know if you’re moving like a well-oiled machine or a rusty hinge? Can you pass these 4 mobility tests?
Why Mobility Matters
Think of your body as a finely tuned car. Without proper maintenance, things get stiff, clunky, and prone to breakdowns. Mobility is the oil that keeps your joints lubricated, your muscles supple, and your movements smooth. It’s the foundation for:
- Injury prevention: Good mobility means a better range of motion, reducing stress on your joints and muscles, and lowering your risk of sprains, strains, and tears.
- Enhanced performance: Whether you’re a weekend warrior or a seasoned athlete, improved mobility translates to better form, greater power, and increased efficiency in your movements.
- Pain relief: Tightness and stiffness can be major contributors to chronic pain. By addressing mobility limitations, you can alleviate aches and pains, and move with greater ease.
- Improved posture: Good posture starts from the inside out. When your joints are mobile and your muscles are balanced, you naturally stand taller and move with more confidence.
The 4 Essential Mobility Tests
Ready to assess your mobility and unlock your inner movement maestro? Grab a mat, some space, and a healthy dose of curiosity. It’s time to put yourself through these 4 revealing tests:
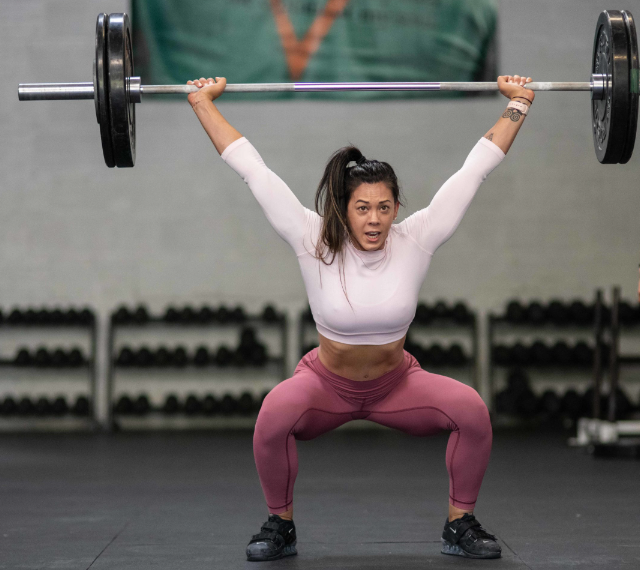
Overhead Squat
This test checks your shoulder, hip, and ankle mobility. Stand tall with your feet shoulder-width apart, toes slightly outward. Reach your arms overhead, palms facing forward. Squat down as low as you can while keeping your back straight, chest lifted, and heels flat on the ground.
- Pass: If you can squat comfortably with your elbows tucked inside your knees and your heels flat, you’re good to go!
- Fail: If your heels come off the ground, your back rounds, or your elbows flare out, you have some work to do on your ankle, hip, and shoulder mobility.
Corrective Exercises:
- Ankle mobility drills: Ankle circles, toe raises, and calf stretches can improve ankle dorsiflexion (upward movement).
- Hip flexor stretches: Pigeon pose, lunges, and hamstring stretches can loosen tight hip flexors.
- Shoulder mobility exercises: Arm circles, doorway chest openers, and overhead press variations can increase shoulder range of motion.
Active Straight Leg Raise
This test assesses your hip flexor mobility and core strength. Lie flat on your back with your legs extended and arms by your sides.
Engage your core and slowly raise one leg straight up towards the ceiling, keeping your lower back pressed into the mat. Repeat with the other leg.
- Pass: If you can raise both legs comfortably without arching your back or feeling pain, you’re on the right track!
- Fail: If you struggle to raise your legs, have difficulty keeping your back flat, or feel pain in your lower back, your hip flexors might be tight and your core needs some strengthening.
Corrective Exercises:
- Hip flexor stretches: Similar to the exercises mentioned in the overhead squat test, focus on lengthening your hip flexors.
- Core strengthening exercises: Planks, dead bugs, and bird dogs can build core stability and improve your ability to maintain a neutral spine during the test.
Thoracic Spine Rotation
This test checks your thoracic spine mobility, which is crucial for good posture and shoulder movement. Kneel on the floor with your toes together and sit back on your heels. Place your hands behind your head with your elbows pointing out. Gently rotate your upper body to one side, looking over your shoulder. Repeat on the other side.
- Pass: If you can comfortably rotate your upper body without feeling any pain or tightness, your thoracic spine is mobile enough.
- Fail: If you struggle to rotate, feel pain in your mid-back, or have a limited range of motion, your thoracic spine needs some attention.
Corrective Exercises:
- Thoracic spine mobility drills: Cat-cow pose, foam rolling your upper back, and doorway chest openers can improve thoracic spine flexibility.
- Shoulder mobility exercises: As mentioned in the overhead squat test, incorporate shoulder mobility exercises to address any limitations contributing to restricted thoracic spine rotation.
Sit and Reach Test
This test assesses your hamstring flexibility and lower back mobility. Sit on the floor with your legs extended in front of you.
Lean forward from your hips, reaching your hands towards your toes (or as far as you can comfortably go) without bending your knees. Keep your back straight and avoid rounding your shoulders.
Pass: If you can touch your toes or get very close with a flat back, your hamstrings and lower back are in good shape.
Fail: If you can’t reach your toes, feel tightness in your hamstrings, or have to round your back to reach further, you have tight hamstrings and/or limited lower back mobility.
Corrective Exercises:
- Hamstring stretches: Forward folds, hamstring hangs, and seated hamstring stretches can lengthen your hamstrings and improve flexibility.
- Lower back mobility exercises: Cat-cow poses, gentle spinal twists, and child’s pose can increase the range of motion in your lower back.
Your Personalized Mobility Journey

These 4 tests offer a snapshot of your overall mobility. But remember, your body is unique, and your limitations and strengths will vary.
Don’t get discouraged if you “fail” any of the tests. Instead, view them as a roadmap, guiding you towards targeted improvements and unlocking your full potential.
Here are some additional tips for your personalized mobility journey:
- Warm up before testing and exercising: Proper warm-up activates your muscles and prepares them for movement, reducing the risk of injury.
- Listen to your body: Don’t push yourself through pain. Stop if you feel any discomfort and modify the exercise as needed.
- Consistency is key: Aim for regular mobility work, even if it’s just 10-15 minutes a day. The more you practice, the greater your gains will be.
- Seek professional help: If you have specific limitations or chronic pain, consult a physical therapist or fitness professional for personalized guidance and tailored exercises.
Embrace the Journey
Remember, mobility is a journey, not a destination. There will be days when your body feels like a well-oiled machine, and others when it feels stiff and uncooperative.
That’s okay! Be patient, celebrate your progress, and enjoy the process of rediscovering your body’s amazing potential.

Bonus Tip: Track your progress! Take photos or videos of yourself performing the tests before and after your mobility routine. This visual feedback can be a powerful motivator and help you track your progress over time.
Unlocking Your Full Potential
By mastering these 4 essential mobility tests and incorporating targeted exercises into your routine, you’ll be well on your way to a more mobile, pain-free, and powerful you.
So, embrace the challenge, conquer your limitations, and move with confidence. Remember, your body is an incredible instrument, and with a little love and attention, you can unlock its full potential and move like the amazing athlete you were always meant to be!
Resources & References
- American College of Sports Medicine: https://www.acsm.org/
- National Strength and Conditioning Association: https://www.nsca.com/
- Mayo Clinic: https://www.mayoclinic.org/healthy-lifestyle/fitness/basics/stretching-and-flexibility/hlv-20049447
- Harvard Health Publishing: https://orthoinfo.aaos.org/en/staying-healthy/flexibility-exercises-for-young-athletes/
FAQs About Mobility Tests
How often should I do mobility tests?
While regularly checking in with your mobility helps track progress and identify areas for improvement, you don’t need to test yourself daily. Aim for 2-3 times a week, incorporating the tests into your warm-up routine or as a dedicated mobility session.
What if I can’t pass all the tests?
Don’t get discouraged! Failing a test simply indicates areas needing some love. Approach it as a roadmap, not a judgment. Celebrate small wins and progress over time. Consistency is key!
Will doing the tests improve my flexibility?
Absolutely! Regularly performing the tests, coupled with targeted corrective exercises, will gradually improve your flexibility. Remember, progress takes time and dedication, so be patient and enjoy the journey!
Can I modify the tests?
Of course! Listen to your body and don’t push through pain. Modify the tests as needed to suit your current limitations. For example, instead of a full squat, use a chair for support, or perform a lunge instead.
What if I have pain during the tests?
Stop immediately if you experience any sharp or persistent pain. Consult a healthcare professional or physical therapist for guidance and personalized modifications.